Быстрый запуск OpenKore
Содержание
Введение
Если вы нюб в освоении OpenKore, то этот простенький мануал поможет вам установить и запустить OpenKore.
Примечание. OpenKore это одна из самых простых бот-программ.
В этом мануале подробно обсуждается каждый шаг по настройке OpenKore. Вы научитесь загружать необходимые файлы, устанавливать пакеты, делать некоторые базовые настройки, проверять данные своего сервера, а также запускать программу.
Необходимые файлы
- Шаг 1: Загрузка свежей (последней) OpenKore
- Во-первых, нужно загрузить OpenKore. Вы можете получить копию программы в разделе "Download" на сайте OpenKore.
- Существует 4 обязательны пакета. Вам необходимо иметь:
- Бинарные файлы OpenKore для Microsoft Windows (start.exe|wxstart.exe, XSTools.dll, NetRedirect.dll)
- Пакет карт
- Пакет файлов настройки
- Пакет таблиц
- Существует 4 обязательны пакета. Вам необходимо иметь:
Примечание. Если вы используете Linux, то вам вместо бинарных файлов нужно загрузить исходники OpenKore (на той же странице в разделе "Other Downloads").
Установка
- Шаг 2: Извлечение пакетов OpenKore
- Извлеките содержимое основного пакета на ваш жесткий диск. Вы можете выбрать любое место для извлечения (например, "C:\").
- Примечание
-
- Убедитесь, что при извлечении файлов, сохранилась структура папок, такая же как и в Zip-архиве.
- Если вы используете WinRar, щёлкните правой кнопкой и выберите "Извлечь в текущую папку".
- Если вы используете WinZip, установите флажок "Использовать имена папок" в диалоговом окне Извлечения.
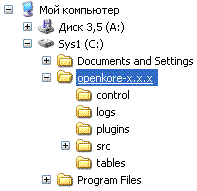
После извлечения основного пакета, у вас появится папка с именем openkore-x.x.x (где "x.x.x" это версия OpenKore). Если вы выбрали для извлечения диск "C:\", то абсолютный путь будет "C:\openkore-x.x.x". Это будет ваша основная папка бота.
Примечание. Если хотите, вы можете переименовать основную папку бота.
Извлеките остальные Zip-архивы (пакет файлов настройки, пакет карт и пакет таблиц) в основную папку бота. После извлечения всех пакетов, у вас должно быть четыре папки в основной папке бота.
- Структура вашего каталога OpenKore должна выглядеть так:
-

Базавая настройка
- Шаг 3: Настройка некоторых основных параметров
- Этот шаг является необязательным. Вы можете пропустить его и выполнить следующий шаг для запуска бота.
- Бот будет работать для большинства профессий, ничего не меняя в стандартной настройке. По умолчанию, бот настроен на прогулку по карте по случайным точкам; на атаку всех мобов вокруг с использованием оружия на близком расстоянии; на поднимание лута упавшего с убитого моба; и на отсидку, когда его HP опускается ниже 40%.
- Если у вас есть Teleport Skill (умение телепортироваться) или Fly Wings (Крылья мухи) в рюкзаке, то бот будет автоматически телепортироваться, когда он близок к смерти. Он будет отменять все входящие сделки, а также парти и приглашения в гильдию.
- Хоть по умолчанию OpenKore подходит для большинства профессий, есть некоторые другие основные параметры, которые вы можете проверить в самом начеле.
Примечание. Хотелось бы чтобы это руководство было как можно более простым. Самая простая профессия для того чтобы сразу начать ботить - это те которые использует оружие, т.к. по умолчанию OpenKore настроена на такие професии. Если вы хотите ботить профессией, использующую прежде всего атакующие скилы (например, Мага), то настройка будет немного сложнее, но не обязательно сложной. Я рекомендую вам вначале ознакомиться с остальной частью мануала, особенно с config.txt, чтобы помочь вам настроить бота. Поэтому я не рекомендую использовать мага в качестве первой профессии при освоении OpenKore.
Краткое руководство по редактированию настроек:
Папка "control" внутри вашего бота содержит набор текстовых файлов, редактируя их (используйте
текстовый редактор) можно установить настройки, которые определяют поведение бота.

Файл config.txt - это основной файл настроек. Это тот файл, в котором настраивается поведение бота.
Он состоит из текстовых строчек каждая из которых содержит название параметра (первое слово в каждой
строке) и соответствующие значение.

attackAuto 2

В приведенном выше примере, "attackAuto" - это название параметра, "2" - его значение. При
редактировании config.txt, вы должны ТОЛЬКО устанавливать или изменять значения.
Вы НЕ ДОЛЖНЫ изменять названия параметров. Не забывайте сохранять файлы после редактирования.
Откройте основную папку бота, перейдите в папку "control" и откройте файл config.txt. Этот файл содержит множество параметров. Пока игнорируйте все параметры кроме тех, которые я приведу ниже.
- 1. Вы хотите бегать на определенной карте?
- OpenKore может заставить бегать вашего бота на карте которую вы укажите. Найдите параметр "lockMap" и установите его значение - имя карты на которой вы хотите ботить, например, prt_fild08.
- Когда бот находится за пределами "lockMap", OpenKore попытается довести вашего бота пешком обратно. Если бот умирает, то OpenKore отправит бота обратно на "lockMap" после регенерации HP.
- 2. Вы используете дистанционное оружие?
- Если вы используете дистанционное оружием (например, лук), то нужно установить параметру "attackDistance" значение дистанции атаки (указать число клеток). Может подойти значение 10, вы можете увеличить его в зависимости от ряда других факторов (например, скилла "Vulture's Eye").
- Если вы не знаете дистанцию атаки, то просто установите "attackDistanceAuto 1". OpenKore автоматически определит правильное значение для "attackDistance", в зависимости от вашего оружия.
- Это были самые основные параметры настройки. Если вы хотите настроить бота более детально, то я рекомендую ознакомиться с разделом, посвящённому config.txt раздел данного руководства в первую очередь. Существуют также другие мануалы, которые вы можете посмотреть на [форуме в OpenKore].
Server Details
- Step 4: Configuring server details
- You would most likely not do anything in this step, if you play on official servers.
- The latest versions of Openkore already have an updated server information for official RO servers that allows you to easily connect without having to configure anything firsthand. It's as easy as simply running the freshly downloaded (and extracted) program.
- If you want to check if Openkore already supports your server, open your main bot folder, browse to the tables subfolder, and open servers.txt. Look for the name of your server in the entries found in this file. The server names are enclosed in square brackets "[ ]".
- If you can't find your server in the list (or if you are having problems connecting to the master server), you have to figure out your server details first before continuing with the next step. Follow the steps provided in the Connectivity Guide. You can also find some good tips here.
If you successfully found your server details or if you are having problems, feel free to post them in the Official and Private Servers Info topic in the Openkore forum. Share your server details so they will be supported in future Openkore versions.
Program Startup
- Step 5: Starting Openkore
- Run the application file "start.exe" inside your main bot folder.
Note. If you are using Linux, run Openkore from the source code. See the instructions on How to run Openkore in Linux.
- The good thing about Openkore is that it detects if you haven't yet configured your login options in config.txt (i.e. username, password, master, server, and char). If you leave your login options empty, Openkore will guide you in properly setting these options at run-time.
- Step 5.1. Loading configuration files
- At startup, Openkore will load all necessary configuration and table files:
      Loading control/macros.txt...
      Loading control/config.txt...
      Loading control/items_control.txt...
      Loading control/mon_control.txt...
      Loading control/overallAuth.txt...
      Loading control/pickupitems.txt...
      Loading control/responses.txt...
      Loading control/timeouts.txt...
      Loading control/shop.txt...
      Loading control/chat_resp.txt...
      Loading control/avoid.txt...
      Loading control/priority.txt...
      Loading control/consolecolors.txt...
      Loading control/routeweights.txt...
      Loading control/arrowcraft.txt...
      Loading tables/cities.txt...
      Loading tables/commanddescriptions.txt...
      Loading tables/directions.txt...
      Loading tables/elements.txt...
      Loading tables/emotions.txt...
      Loading tables/equiptypes.txt...
      Loading tables/haircolors.txt...
      Loading tables/headgears.txt...
      Loading tables/items.txt...
      Loading tables/itemsdescriptions.txt...
      Loading tables/itemslots.txt...
      Loading tables/itemslotcounttable.txt...
      Loading tables/itemtypes.txt...
      Loading tables/maps.txt...
      Loading tables/monsters.txt...
      Loading tables/npcs.txt...
      Loading tables/packetdescriptions.txt...
      Loading tables/portals.txt...
      Loading tables/portalsLOS.txt...
      Loading tables/recvpackets.txt...
      Loading tables/servers.txt...
      Loading tables/sex.txt...
      Loading tables/skills.txt...
      Loading tables/skills.txt...
      Loading tables/skills.txt...
      Loading tables/skills.txt...
      Loading tables/skills.txt...
      Loading tables/spells.txt...
      Loading tables/skillsdescriptions.txt...
      Loading tables/skillssp.txt...
      Loading tables/skillsstatus.txt...
      Loading tables/skillsailments.txt...
      Loading tables/skillsstate.txt...
      Loading tables/skillslooks.txt...
      Loading tables/skillsarea.txt...
      Loading tables/skillsencore.txt...
      Checking for new portals... none found
      _
- Step 5.2. Setting your username
Note. If you have previously set your username, this step will not appear.
- Openkore will prompt you for your username:
      Enter Username:
      _
- Type your username in the console.
Note. Kore will automatically set this option (username) in config.txt so you won't have to specify it again everytime you run Openkore.
- Step 5.3. Setting your password
Note. If you have previously set your password, this step will not appear.
- Openkore will prompt you for your password:
      Enter Password:
      _
- Type your password in the console.
Note. Kore will automatically set this option (password) in config.txt so you won't have to specify it again everytime you run Openkore.
- Step 5.4. Choosing a master server
Note. If you have previously set your master server, this step will not appear.
- Openkore will show you a numbered list of known RO servers.
      ------- Master Servers --------
      #         Name
      0    AvalonRO Private Server
      1    Brazil - bRO
      2    EuphRO Private Server
      3    Europe - euRO
      4    ExcaliburRO Private Server
      5    Hakore Server
      6    India - inRO
      7    Indonesia - idRO: Chaos/Loki/Iris/Fenrir
      8    Indonesia - idRO: Sakray
      9    International - iRO: Chaos/Loki/Iris
      10   International - iRO: Sakray
      11   Malaysia - mRO (English): Iris/Penril/Odin/
      12   Malaysia - mRO: Main Server
      13   Malaysia - mRO: Sakray
      14   NamelessRO: Eclipse Private Server
      15   NamelessRO: Sunrise Private Server
      16   Oceania/Australia - oRO
      17   Oceania/Australia - oRO: Sakray
      18   Philippines - pRO: Fenrir/Iris/Lydia
      19   Philippines - pRO: Loki/Sarah
      20   Philippines - pRO: Odin/Chaos
      21   Philippines - pRO: Sakray
      22   Philippines - pRO: Urdr
      23   ProjectRO Private Server
      24   SonicRO Private Server
      25   Thailand - tRO Account 1: Fenrir,Lydia,Sara
      26   Thailand - tRO Account 1: Sol, Chaos, Loki,
      27   Thailand - tRO Account 2: Frigg,Freya,Baldu
      28   Thailand - tRO Account 2: Honir,Odin,Thor
      29   Thailand - tRO Account 3: Bijou, Grimnir, B
      30   Thailand - tRO Account 3: Isa, Tyr, Idun
      31   VanRO: Medium Rate Private Server
      32   XaosRO Private Server
      33   aeRO Private Server
      34   agRO Private Server
      35   mobRO Private Server
      36   powRO Private Server
      37   qRO Private Server
      -------------------------------
      Enter the number of your master server:
      _
- Choose the master server where you want to bot in and type the corresponding number in the console.
Note. Kore will automatically set this option (master) in config.txt so you won't have to specify it again everytime you run Openkore.
- If you can't find your server in the displayed list, read the fourth step in this guide again. Exit the program for now by closing the console window. Restart this step after you have properly configured your server details.
- Step 5.5. Connecting to Master Server
- If you have your username, password and master server properly set in config.txt, Kore will now login to the Master Server using your login details. Your account information will be retrieved and a list of available game login servers from the master server will be displayed:
      Connecting to Master Server...
      Connecting (127.0.0.1:6900)... connected
      ---------Account Info-------------
      Account ID: 2000003    83 84 1E 00
      Sex:        Boy
      Session ID: 2135588863 FF 7F 4A 7F
                  269906564  84 72 16 10
      ----------------------------------
      --------- Servers ----------
      #         Name            Users  IP              Port
      0   Bot-Owns              0      127.0.0.1       6121
      -------------------------------
      Closing connection to Master Server
      Disconnecting (127.0.0.1:6900)... disconnected
      _
- If you can't connect, this error will appear:
      Connecting to Master Server...
      Connecting (127.0.0.1:6900)... couldn't connect: Unknown error
      _
- The reason for this may be one of the following
-
- You are not connected to the internet.
- Your server is currently down, or under server maintenance.
- The server details is outdated. Read the fourth step in this guide again or consult the Openkore forum for latest news and updates.
- Step 5.6. Choosing your server
Note. If you have previously set your server, this step will not appear.
- Openkore will prompt you for a server:
      --------- Servers ----------
      #         Name            Users  IP              Port
      0   Bot-Owns              0      127.0.0.1       6121
      -------------------------------
      Closing connection to Master Server
      Disconnecting (127.0.0.1:6900)... disconnected
      Choose your server.  Enter the server number:
      _
- Choose the server where you want to bot in and type the corresponding number in the console.
Note. Kore will automatically set this option (server) in config.txt so you won't have to specify it again everytime you run Openkore.
- Step 5.7. Connecting to Game Login Server
- If you have your server specified in config.txt, Kore will now login to the server. All your available characters will be listed:
      Connecting to Game Login Server...
      Connecting (127.0.0.1:6121)... connected
      Received characters from Game Login Server
      ---------------------- Character List ----------------------
        # Name                               Job             Lv
        0 GMHakore                           Priest          99/50
      ------------------------------------------------------------
      _
- Step 5.8. Choosing your character
Note. If you have previously set the option char in config.txt, this step will not appear.
- Openkore will prompt you to choose a character. You also have the option to create a new character or delete an existing character:
      ---------------------- Character List ----------------------
        # Name                               Job             Lv
        0 GMHakore                           Priest          99/50
      ------------------------------------------------------------
      Type 'c' to create a new character, or type 'd' to delete a character.
      Or choose a character by entering its number.
      _
- If you already have a character created in your account, simply choose the character you want to bot and type the corresponding number in the console.
Note. Kore will automatically set this option (char) in config.txt so you won't have to specify it again everytime you run Openkore.
- If you haven't created a character, Kore can help you on how to create a new character. However, the steps are beyond the scope of this guide, so it will not be explained in detail here. Just follow the instructions given by Kore and you'll do fine.
- Step 5.9. Botting starts
- With all your login details set up, Kore will now login to the map server and start the game:
      Received character ID and Map IP from Game Login Server
      ----------Game Info----------
      Char ID: F5 49 02 00 (150005)
      MAP Name: gef_fild04.gat
      MAP IP: 127.0.0.1
      MAP Port: 5121
      -----------------------------
      Closing connection to Game Login Server
      Disconnecting (127.0.0.1:6121)... disconnected
      Connecting to Map Server...
      Connecting (127.0.0.1:5121)... connected
      You are now in the game
      Your Coordinates: 312, 273
      Remove perfectly hidden Player Unknown #150001 (0)
      Remove perfectly hidden Monster Poring (0)
      Calculating random route to: Geffen Field(gef_fild04): 257, 353
      _
- Congratulations! You have successfully set up Openkore! Your character will now walk around Midgard, kill monsters, and take loots!
- You shouldn't have any problems setting up Kore if you follow this guide. If you do however experience problems after trying all possible solutions your intelligent mind can think of, post an intelligent question in the Openkore Forum.
Final Notes
- Step 6: Reading the rest of the manual
- Configuring Kore does not end here. You must now read the rest of the manual and start some advanced configuration of your bot, especially if you want to use skills. There are also tons other nice features and options that you would want to exploit.